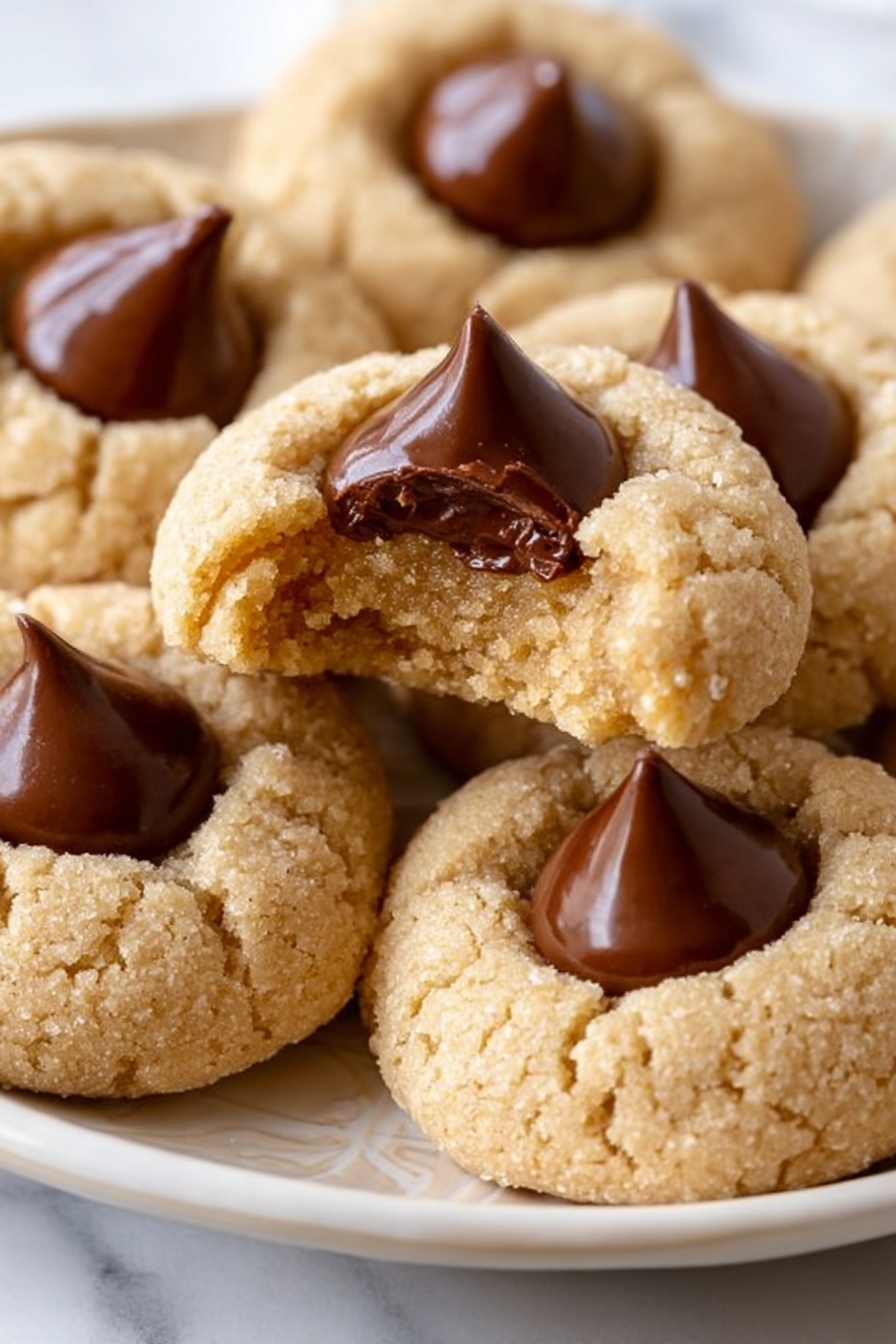
There’s something truly comforting about classic peanut butter cookies, especially when they have that sweet surprise of a chocolate kiss right on top. This Peanut Butter Cookies with Chocolate Kisses Recipe brings back all those warm childhood memories with every chewy bite and melty chocolate center.

Jump to:
- Why You'll Love This Recipe
- Ingredients & Why They Work
- Make It Your Way
- Step-by-Step: How I Make Peanut Butter Cookies with Chocolate Kisses Recipe
- Top Tip
- How to Serve Peanut Butter Cookies with Chocolate Kisses Recipe
- Make Ahead and Storage
- Frequently Asked Questions:
- Final Thoughts
- Peanut Butter Cookies with Chocolate Kisses Recipe
Why You'll Love This Recipe
This recipe isn’t just easy; it’s a guaranteed crowd-pleaser and one I’ve made countless times for everything from school bake sales to late-night snack cravings. There’s a special magic when peanut butter meets chocolate in such a classic cookie form.
- Simple Ingredients: You likely have everything you need in your pantry, making it quick and easy to whip up a batch on a whim.
- Perfect Texture: Soft, chewy, but just a little crisp on the edges—this balance is exactly what you want in a peanut butter cookie.
- Classic Appeal: That chocolate kiss on top adds just the right hint of melty sweetness, elevating an everyday cookie into something special.
- Family Favorite: It’s a nostalgic recipe that always brings smiles and requests for more from kids and adults alike.
Ingredients & Why They Work
Every ingredient in this recipe plays a specific role in achieving that perfect soft and chewy consistency, with a rich peanut butter flavor that shines through. Here's why each component is important and some tips to keep your ingredients top-notch.
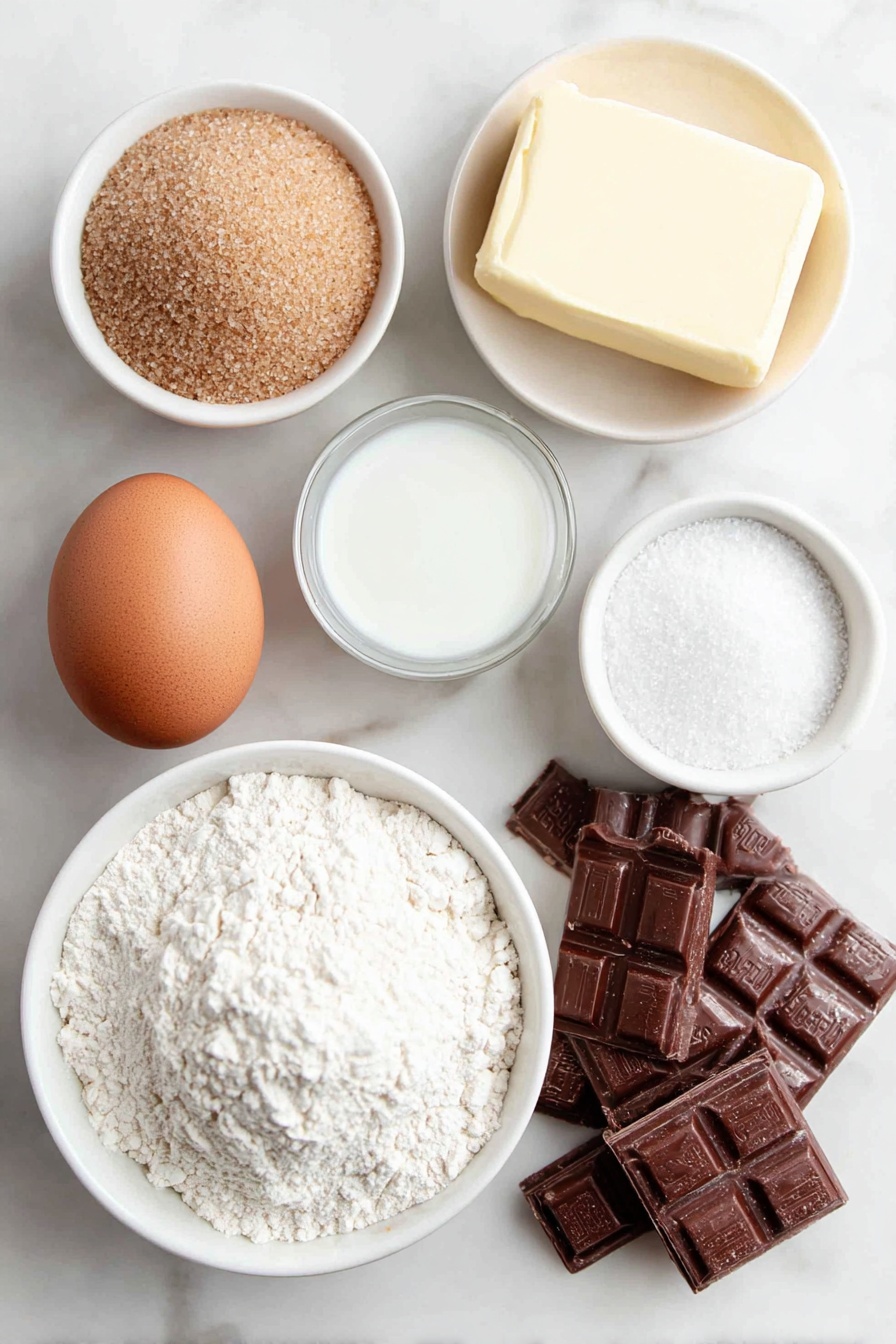
- Unsalted Butter: Adds richness and moisture; softened butter cream together easily with sugars, creating the perfect base.
- Creamy Peanut Butter: Provides that classic peanut flavor and helps keep the cookie tender; creamy works best for smooth texture.
- Light Brown Sugar: Adds moisture and subtle caramel notes, which contribute to softness and chewiness.
- Granulated Sugar: Enhances crisp edges and gives a slight crunch when rolling the dough balls.
- Vanilla Extract: Lifts and rounds out the flavors with a warm, sweet note.
- Egg: Binds the ingredients while helping the cookie puff slightly and hold its shape.
- Milk: Just a touch to loosen the dough slightly for easier mixing and better texture.
- Baking Soda: Gives a gentle lift and contributes to that delicate crumb structure.
- Salt: Balances the sweetness and enhances the peanut flavor.
- All-Purpose Flour: The structure-building component, providing the right balance so the cookies aren’t too cakey or too dense.
- Hershey’s Kisses: The iconic finishing touch—melts just enough on warm cookies for that gooey, chocolatey center.
Make It Your Way
I love experimenting a bit by swapping creamy peanut butter for chunky when I want an extra nutty crunch in my cookies. You should feel free to tweak this recipe to fit your taste or dietary needs—it’s surprisingly versatile!
- Variation: Adding a teaspoon of cinnamon or a pinch of cayenne pepper gives a fun, unexpected twist that I’ve found my friends enjoy at parties.
- Dietary Swap: Use a plant-based butter and egg substitute to make these cookies vegan-friendly without sacrificing texture.
- Seasonal Twist: During the holidays, I sometimes roll the dough balls in colored sugar sprinkles instead of plain granulated sugar for a festive pop.
Step-by-Step: How I Make Peanut Butter Cookies with Chocolate Kisses Recipe
Step 1: Cream Together the Butters and Sugars
Start by softening your butter, so it creams effortlessly. Mix the butter and peanut butter together until smooth, then add the brown and granulated sugars. Cream everything until light and fluffy. This step is crucial for that melt-in-your-mouth texture, so take your time to beat well but don’t overdo it or the dough might get too soft.
Step 2: Add the Eggs, Vanilla, and Milk
Next, beat in the egg, vanilla extract, and milk. The milk thins the dough just a bit, making it easier to scoop later on. Mix on medium speed until the mixture is well combined—this ensures your cookies have a consistent texture.
Step 3: Incorporate Dry Ingredients
Stir in baking soda and salt, then slowly add your flour. I recommend mixing this part just until the flour disappears. Overmixing here can make the cookies tough, something I learned the hard way!
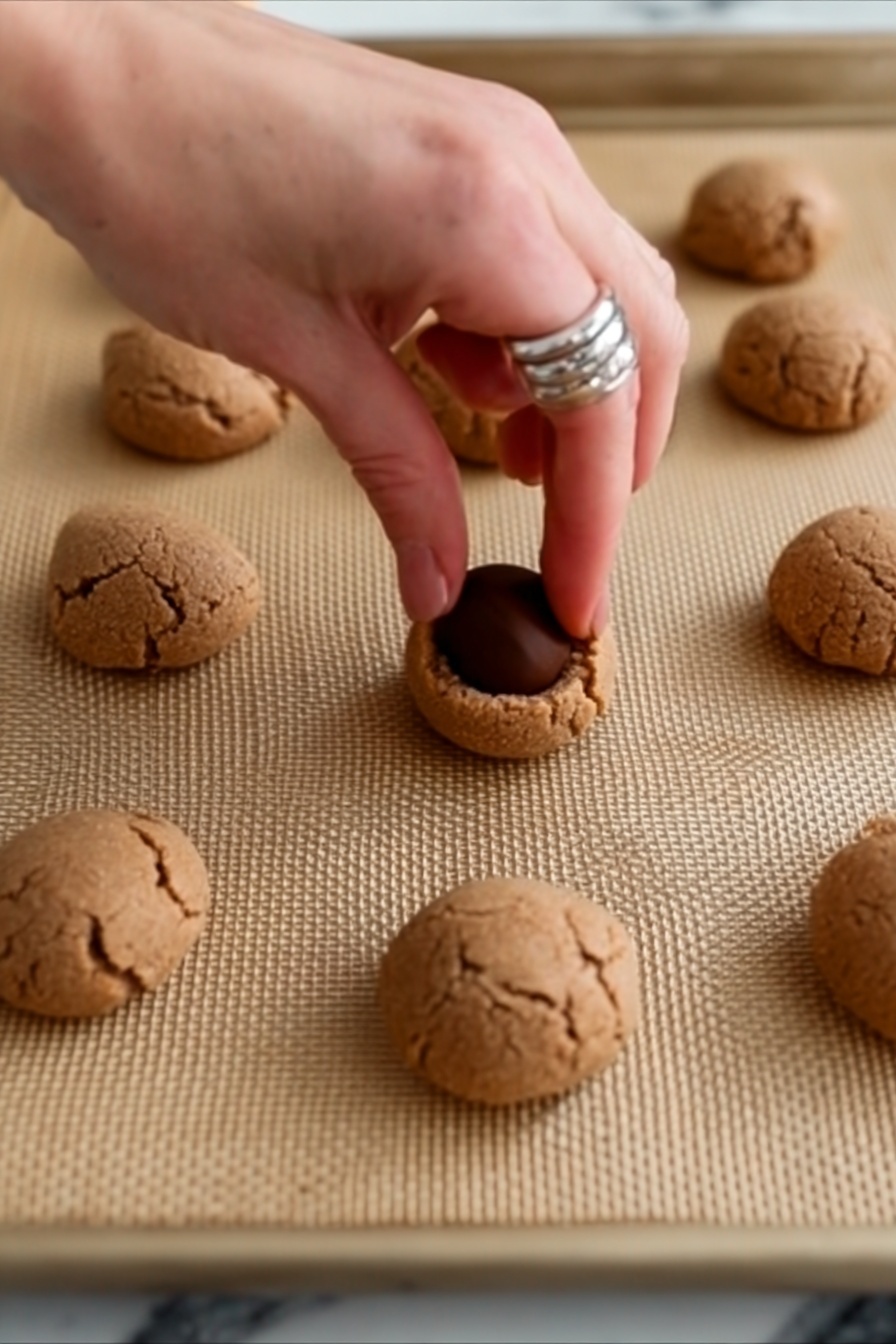
Step 4: Shape, Roll in Sugar, and Bake
Roll tablespoon-sized balls of dough and coat them generously in granulated sugar. This crunch of sugar outside is my favorite little touch—it gives just the right texture contrast with the soft cookie. Space them a couple inches apart on lined baking sheets.
Step 5: Bake and Add Chocolate Kisses
Bake the cookies at 350°F for about 9–13 minutes. You want the edges to turn a light golden brown and the tops to lose their glossy sheen. Right after taking them out of the oven, press a Hershey’s Kiss gently into the center of each cookie. They'll soften and melt slightly, creating that perfect chocolate surprise.
Top Tip
I've made these cookies dozens of times, and a few small tweaks have really helped me get the perfect texture every time. Here are some tips that I hope will help you avoid common pitfalls.
- Butter Temperature: Make sure your butter is softened but not melted—too soft and your dough will be greasy and spread too much in the oven.
- Don’t Overmix After Adding Flour: Once you add flour, mix just enough to combine. Overmixing develops gluten and makes cookies tough.
- Use Fresh Baking Soda: Old baking soda can cause flat cookies, so check that yours is fresh for the best rise.
- Add Kisses Immediately: Press the chocolate in while the cookies are hot so the Kiss melts just right without losing its shape.
How to Serve Peanut Butter Cookies with Chocolate Kisses Recipe
Garnishes
I usually keep it simple and let the chocolate kiss be the star, but sometimes I sprinkle a tiny pinch of flaky sea salt over the top right after adding the chocolate. That balance of salty and sweet is indulgent and irresistible.
Side Dishes
These cookies go wonderfully with a cold glass of milk—nothing fancy needed! For holiday gatherings, I like pairing them with fresh fruit platters or even a hot cup of coffee or tea for the grown-ups.
Creative Ways to Present
For parties, I’ve arranged these cookies on festive platters layered with parchment and tied with a simple ribbon for a charming homemade gift. Another fun idea is to place a cookie on the rim of a milk glass for a whimsical, nostalgic touch kids adore.
Make Ahead and Storage
Storing Leftovers
I store any leftover cookies in an airtight container at room temperature, layered with parchment to prevent sticking. They usually last well for about 4-5 days and stay soft and delicious.
Freezing
If you want to freeze them, I recommend freezing the unbaked dough balls on a tray first, then transferring them to a zip-top bag. When ready, just bake straight from frozen, adding a couple of extra minutes to the baking time.
Reheating
To refresh leftover cookies, pop them in the microwave for 10 to 15 seconds. It brings back that fresh-baked softness, and the chocolate kiss softens up again beautifully.
Frequently Asked Questions:
Natural peanut butter tends to be more oily and less stable for baking, which can affect the texture and spread of your cookies. I suggest using creamy, processed peanut butter for the best classic result.
Flattening often happens if the butter is too soft or melted when creamed, or if there’s too little flour. Make sure to chill your butter just to room temperature and measure your flour correctly—spoon and level it rather than scooping directly from the bag.
Yes! Substitute the all-purpose flour for a 1:1 gluten-free baking flour blend. I recommend adding a bit of xanthan gum if your blend doesn’t already contain it, to help with texture.
To keep the chocolate kiss looking neat, press it into the warm (not hot) cookie right after baking. Let the cookies cool on the baking sheet before transferring to a wire rack. This way, the chocolate won’t completely melt and spread.
Final Thoughts
Making this Peanut Butter Cookies with Chocolate Kisses Recipe has become one of my go-to joys in baking—the smell alone brings back such happy memories. I hope you enjoy making and sharing these with your loved ones as much as I do. Trust me, once you try this easy, nostalgic recipe, it’ll quickly become a household favorite!
Print
Peanut Butter Cookies with Chocolate Kisses Recipe
- Prep Time: 20 minutes
- Cook Time: 13 minutes
- Total Time: 33 minutes
- Yield: 40 cookies
- Category: Dessert
- Method: Baking
- Cuisine: American
Description
This Easy Peanut Butter Blossoms recipe features soft and chewy peanut butter cookies topped with classic Hershey's Kisses. Perfectly sweet and nostalgic, these cookies are simple to make and ideal for any occasion.
Ingredients
Base Ingredients
- ½ cup unsalted butter, softened (113 g)
- ¾ cup creamy peanut butter (213 g)
- ¾ cup light brown sugar, packed (138 g)
- ¼ cup granulated sugar (50 g), plus more for rolling
- 1 teaspoon vanilla extract (5 ml)
- 1 large egg
- 1 tablespoon milk (15 ml)
- ½ teaspoon baking soda
- ¼ teaspoon salt
- 1 ¾ cup all-purpose flour (248 g)
- 40 Hershey's Kisses (or a few more)
Instructions
- Preheat Oven: Preheat the oven to 350°F (175°C). Line two cookie sheets with silicone baking mats or parchment paper to prepare for baking.
- Cream Ingredients: In a large bowl, combine the softened butter and creamy peanut butter. Using a hand mixer or stand mixer, blend until smooth. Add both the light brown sugar and granulated sugar, creaming until the mixture is smooth and fluffy.
- Add Wet Ingredients: Mix in the egg, vanilla extract, and milk at medium speed until all ingredients are fully incorporated.
- Incorporate Dry Ingredients: Add baking soda and salt to the mixture, stirring to combine. Slowly add the flour while mixing just until the batter is smooth and comes together, making sure to scrape down the sides of the bowl to ensure even mixing.
- Prepare Dough Balls: Pour about ½ cup of granulated sugar into a separate bowl. Scoop tablespoon-sized balls of dough and roll each one in the sugar until fully coated. Place the coated dough balls 2 inches apart on the prepared cookie sheets.
- Bake Cookies: Bake the cookies in the preheated oven for 13 minutes or until the edges are lightly golden and the tops are no longer glossy.
- Add Chocolate Kisses: Immediately after removing the cookies from the oven, press an unwrapped Hershey's Kiss into the center of each warm cookie. Allow the cookies to cool completely on the cookie sheets before removing.
Notes
- For a richer peanut flavor, use fresh natural peanut butter without added sugars.
- Ensure cookies are spaced sufficiently apart as they will spread slightly during baking.
- Using silicone mats or parchment paper prevents sticking and helps even baking.
- Rolling dough balls in sugar before baking adds a sweet, crunchy outer layer.
- Place the Kiss chocolate immediately after baking so it softens properly without melting completely.
- Store cookies in an airtight container to maintain freshness for up to one week.
Nutrition
- Serving Size: 1 cookie
- Calories: 152 kcal
- Sugar: 9 g
- Sodium: 122 mg
- Fat: 8 g
- Saturated Fat: 3 g
- Unsaturated Fat: 5 g
- Trans Fat: 0 g
- Carbohydrates: 17 g
- Fiber: 1 g
- Protein: 3 g
- Cholesterol: 17 mg


Leave a Reply