There’s something truly magical about these melt-in-your-mouth treats that instantly lift my spirits. This Peppermint Meltaway Cookies Recipe combines soft buttery goodness with a hint of fresh peppermint, making every bite feel like a cozy holiday hug.

Jump to:
Why You'll Love This Recipe
I remember the first time I baked these peppermint meltaway cookies — the aroma filled my kitchen with such a festive vibe that it instantly became a new favorite tradition. They’re a beautiful balance of buttery softness and refreshing peppermint that’s not overpowering, just right.
- Soft, but not crumbly: Thanks to the cornstarch and confectioners’ sugar, these cookies have that tender “melt away” texture you want in a special holiday treat.
- Perfect peppermint flavor: A touch of peppermint extract adds freshness without being too intense — just enough to brighten every bite.
- Simple to make: You don’t need fancy tools or exotic ingredients, and chilling the dough is a gamechanger for the texture.
- Beautiful presentation: Topped with crushed candy canes, they look festive and taste like a winter wonderland in cookie form.
Ingredients & Why They Work
This recipe nails the meltaway effect by blending soft butter, cornstarch, and confectioners’ sugar — all working together to create that pillowy, tender crumb. Using room temperature ingredients and quality peppermint extract really takes these cookies over the top.
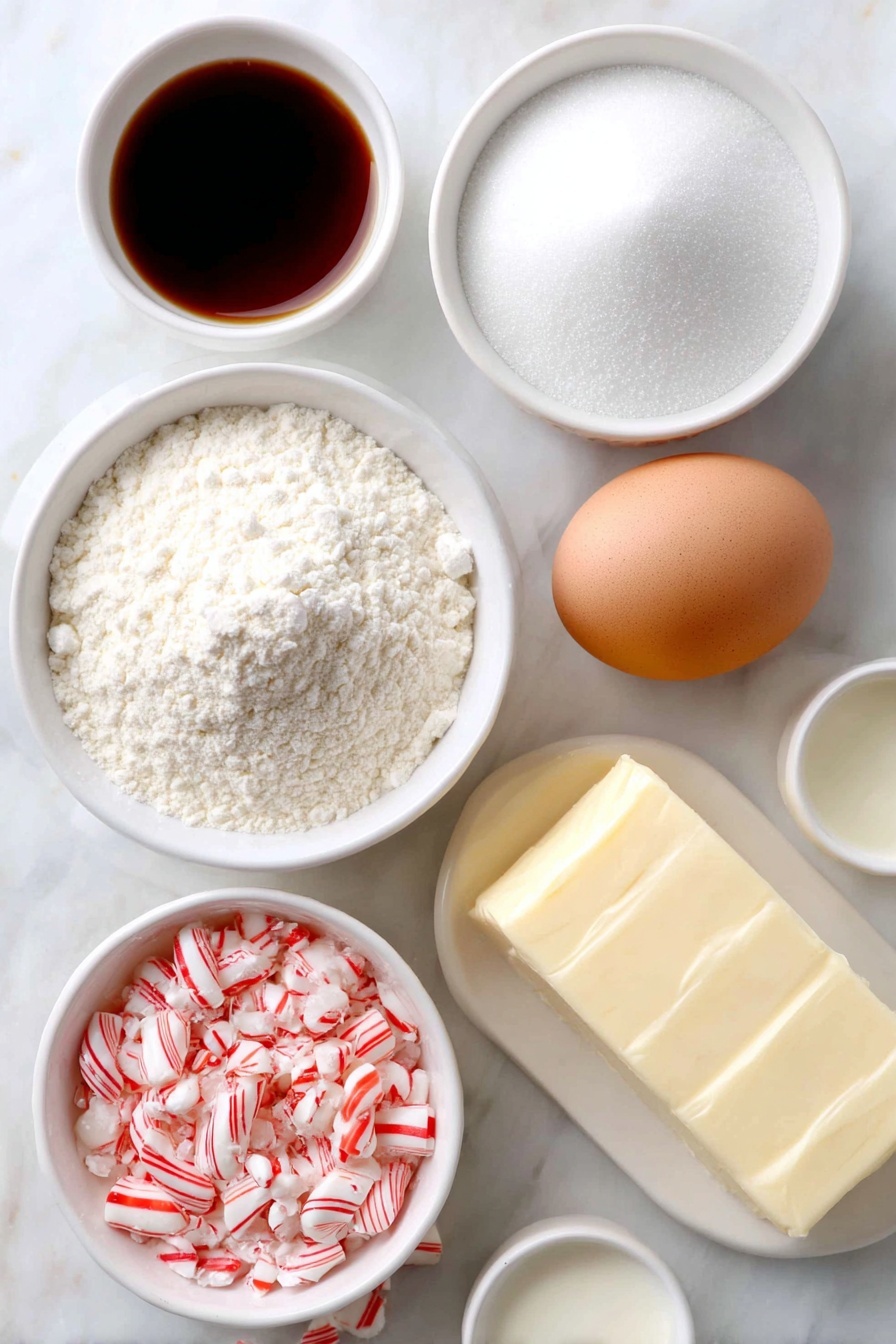
- Unsalted Butter: Using unsalted butter gives you full control over the salt level, and softening it to room temperature is key for smooth creaming.
- Confectioners’ Sugar: It adds sweetness and helps create the delicate texture instead of granulated sugar which can be more gritty.
- Egg Yolk: Adds richness and binds the dough without weighing down the cookies.
- Pure Vanilla Extract: A subtle background sweetness that complements the peppermint wonderfully.
- Peppermint Extract: Use sparingly to avoid overpowering the cookies; it brightens the overall flavor.
- All-Purpose Flour: Provides the structure for the cookies; spooning and leveling avoids adding too much flour, which can dry them out.
- Cornstarch: The secret weapon for tenderness — it softens the flour’s protein and gives that lovely "meltaway" texture.
- Baking Powder: Adds just enough lift to keep the cookies light.
- Salt: Enhances all the flavors and balances the sweetness.
- Milk (for frosting): Controls the frosting’s consistency — add a little at a time for perfect spreadability.
- Crushed Candy Canes: Not just for garnish; they add a crunchy peppermint pop that contrasts beautifully with the soft cookie.
Make It Your Way
One of my favorite things about this Peppermint Meltaway Cookies Recipe is how easy it is to tailor. Whether you want to dial up the peppermint or soften the sweetness, it’s kind of foolproof to tweak to your liking.
- Variation: I sometimes add a bit of finely chopped dark chocolate to the frosting for a peppermint-chocolate combo – a personal favorite after a few trial runs.
- Dairy-Free Version: Swapping regular butter for good-quality vegan butter and using a plant-based milk in the frosting works beautifully with no loss in texture or flavor.
- Add a Color Pop: A drop of red or pink food coloring in the frosting gives that classic holiday cheer without changing the taste.
Step-by-Step: How I Make Peppermint Meltaway Cookies Recipe

Step 1: Cream the Butter and Sugar to Fluffy Perfection
Start by beating your softened butter on medium speed for about a minute until it’s nice and creamy. Then add the confectioners’ sugar, mixing on low briefly before cranking it up to medium-high for 2 full minutes. This light and fluffy base is what makes the cookies wonderfully tender, so don’t rush this part. Scrape down the bowl sides to make sure everything’s evenly blended.
Step 2: Mix in the Flavors and Egg Yolk
Next, beat in the egg yolk, vanilla, and peppermint extracts on high speed until smooth and combined. The colors will turn silky and beautiful — this is when you start smelling that signature peppermint scent that gets you excited.
Step 3: Add the Dry Ingredients and Chill
Lower the mixer speed and gently blend in the flour, cornstarch, baking powder, and salt. The dough will be thick and creamy — perfect! Now, don’t skip chilling. Cover the dough tightly and refrigerate for at least 30 minutes. This crucial step firms up the butter and helps the cookies keep their shape while baking.
Step 4: Shape and Bake the Cookies
Preheat your oven to 350°F (177°C) and line your baking sheets. Scoop out tablespoon-sized portions of dough, roll them into balls, and place them 3 inches apart. Flatten each gently to just under 2 inches across with your palm – they won’t spread much otherwise. Bake for 13–14 minutes until the edges look set, but be careful not to color them. The subtle look keeps their delicate nature intact.
Step 5: Prepare the Peppermint Buttercream Frosting
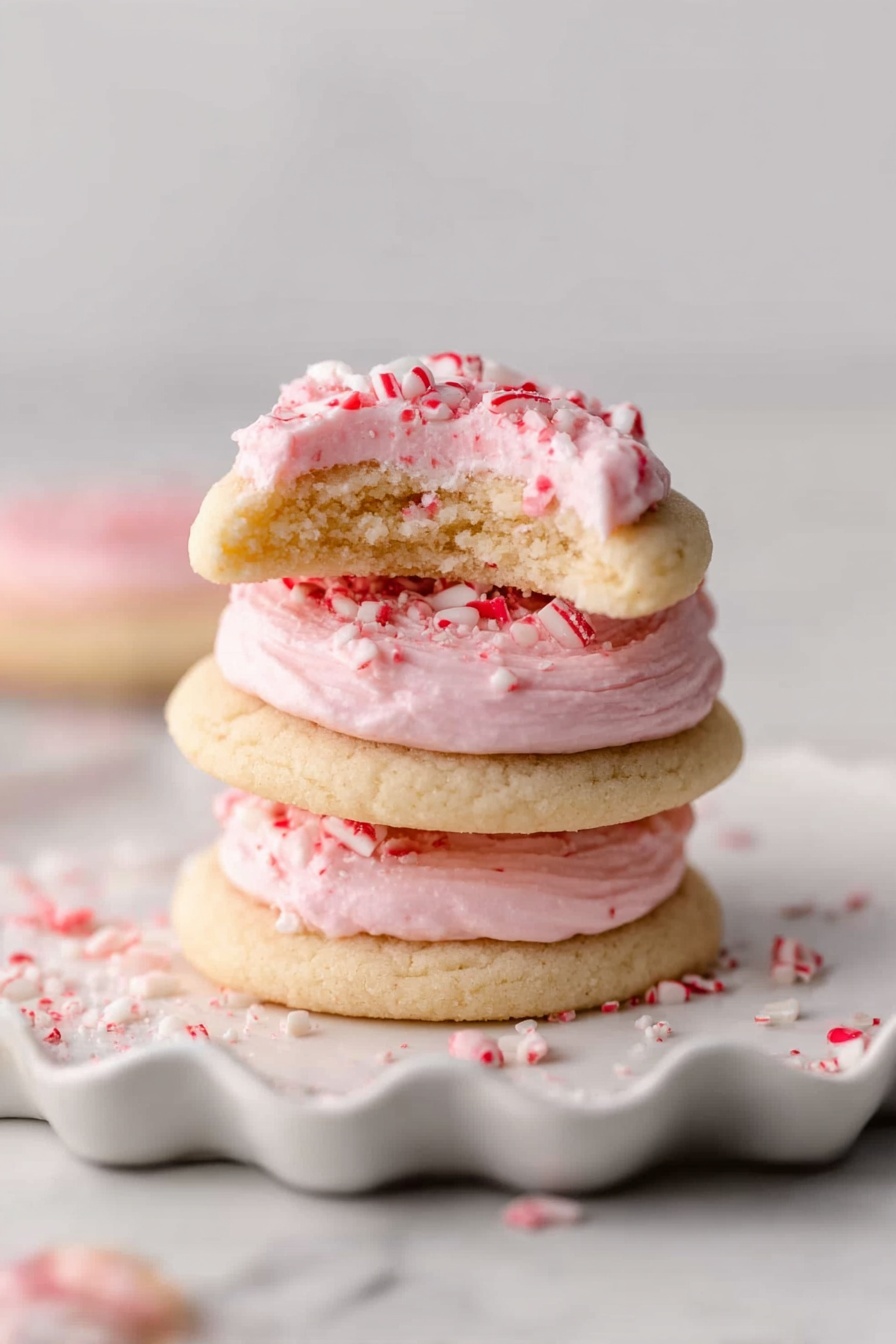
While the cookies cool, whip up that dreamy frosting. Beat softened butter until creamy, then add confectioners’ sugar, milk, vanilla, and peppermint extracts. Beat on high until smooth and fluffy. You can adjust the frosting thickness by adding a bit more sugar or milk. A tiny drop of red or pink food coloring adds cheer if you want. Frost the cooled cookies using a knife or spatula.
Step 6: Add Crushed Candy Cane Garnish and Enjoy!
Sprinkle crushed candy canes on the frosted cookies as soon as you spread the frosting so they stick well. Now let them sit for a few hours to “soft-set” the frosting — it’ll get just slightly firm on top but still delightfully creamy underneath. Then all that’s left is to savor every meltaway bite!
Top Tip
My experience with this Peppermint Meltaway Cookies Recipe taught me that patience really pays off. The dough chilling step is non-negotiable for the best texture. Rushing it leads to cookies that lose their characteristic tender “meltaway” quality.
- Perfect Butter Temperature: Make sure your butter is softened but not melting — too soft butter makes the dough greasy and sticky.
- Don’t Skip Chilling: Chilling firms the dough so the cookies don’t spread too much and keeps the crumb tender.
- Flatten Dough Balls Gently: This helps the cookies bake evenly without puffing up too thick or cracking on top.
- Watch Baking Time Closely: Because these cookies don’t brown much, rely on edges looking set rather than color to avoid overbaking.
How to Serve Peppermint Meltaway Cookies Recipe
Garnishes
I always go for crushed candy canes as a garnish because they add just the perfect crunch and peppermint burst that contrasts with the soft cookie and creamy frosting. Sometimes I sprinkle a tiny pinch of edible glitter for extra holiday sparkle when it’s gift-giving season.
Side Dishes
When sharing with friends, I like to serve these cookies alongside a cup of hot cocoa or peppermint tea — the warmth complements the minty cookie flavor perfectly. They’re also fantastic with coffee for a festive afternoon treat.
Creative Ways to Present
For special occasions, I arrange the cookies on a holiday-themed platter layered with fresh pine sprigs and cranberries, creating an inviting centerpiece. Wrapping boxes with clear lids and adding a sprig of candy cane on top makes a beautiful homemade gift everyone loves.
Make Ahead and Storage
Storing Leftovers
Once frosted, I store the cookies in an airtight container at room temperature and eat them within a day for best freshness. The frosting soft-sets nicely and keeps the cookies tender but beware that after longer storage they can lose that special meltaway texture.
Freezing
If you want to freeze, I recommend freezing the plain baked cookies (without frosting) in a single layer on a tray first. Once solid, transfer them to a freezer bag. This keeps them fresh for a couple of months. You can frost them after thawing.
Reheating
For thawed cookies, I like to warm them gently in a low oven (about 275°F for 5 minutes) — this revives that fresh-baked softness. If they’re frosted, let them come to room temp first so frosting softens beautifully.
Frequently Asked Questions:
Yes, you can omit the peppermint extract if you prefer a basic meltaway cookie flavor. However, the peppermint is what gives this recipe its festive and refreshing character. You might consider substituting with vanilla or almond extract if you want a different twist.
Chilling the dough solidifies the butter, which helps the cookies hold their shape and develop their tender, meltaway texture. It also allows the flavors to meld together better. Skipping this step often results in cookies that spread too much or become crumbly.
The use of cornstarch and confectioners’ sugar instead of granulated sugar helps create a tender crumb that dissolves easily on your tongue, giving that signature meltaway sensation. The creaming technique and chilling also contribute to the soft texture.
You can substitute the all-purpose flour for a gluten-free flour blend that behaves like regular flour, such as one containing xanthan gum. I recommend checking your blend’s recommendations for 1:1 substitution, but keep in mind the texture may vary slightly, so testing is advised.
Final Thoughts
These peppermint meltaway cookies hold a special place in my holiday baking lineup. The softness, the gentle peppermint, and the sweet candy cane crunch make them stand out from everyday cookies. I promise when you try this Peppermint Meltaway Cookies Recipe, you’ll find it hard to stop at just one — a true sign of a keeper!
Print
Peppermint Meltaway Cookies Recipe
- Prep Time: 1 hour
- Cook Time: 14 minutes
- Total Time: 1 hour 30 minutes
- Yield: 30 cookies
- Category: Dessert
- Method: Baking
- Cuisine: American
- Diet: Vegetarian
Description
Peppermint Meltaway Cookies are irresistibly soft, buttery, and sweet holiday treats with a unique texture between shortbread and cakey cookies that melt in your mouth. These festive cookies feature a creamy dough enriched with peppermint extract, chilled for perfect texture, and topped with a smooth peppermint buttercream frosting sprinkled with crushed candy canes.
Ingredients
Cookie Dough
- 1 cup (16 Tbsp; 226g) unsalted butter, softened to room temperature
- ⅔ cup (80g) confectioners’ sugar
- 1 egg yolk, at room temperature
- 1 teaspoon pure vanilla extract
- ½ teaspoon peppermint extract
- 2 cups (250g) all-purpose flour (spooned & leveled)
- ¼ cup (30g) cornstarch
- 1 teaspoon baking powder
- ¼ teaspoon salt
Frosting
- 6 Tablespoons (85g) unsalted butter, softened
- 1 and ½ cups (180g) confectioners’ sugar
- 1–2 Tablespoons milk, at room temperature (dairy or nondairy)
- ½ teaspoon pure vanilla extract
- ¼ teaspoon peppermint extract
- optional: 1 drop red or pink food coloring
- ¼ cup (40g) crushed candy canes (about 2–3 large candy canes)
Instructions
- Cream Butter and Sugar: In a large bowl using a handheld or stand mixer fitted with a paddle attachment, beat the butter on medium speed until creamy, about 1 minute. Add the confectioners’ sugar and beat on low speed for 30 seconds, then increase to medium-high speed and beat for 2 minutes, until light and fluffy. Scrape down the sides and bottom of the bowl as needed.
- Add Wet Ingredients: Add the egg yolk, vanilla extract, and peppermint extract. Beat on high speed until combined, scraping down the bowl as necessary.
- Incorporate Dry Ingredients: Add flour, cornstarch, baking powder, and salt. Beat on low speed until just combined into a thick, creamy dough. Cover tightly and chill in the refrigerator for at least 30 minutes, up to 3 days.
- Preheat Oven and Prepare Baking Sheets: Preheat oven to 350°F (177°C). Line large baking sheets with parchment paper or silicone baking mats.
- Shape Cookies: Scoop and roll dough into 1 tablespoon sized balls (about 20–22g each). Place dough balls 3 inches apart on baking sheets. Slightly flatten each ball with the palm of your hand to just under 2 inches in diameter.
- Bake Cookies: Bake for 14 minutes or until edges appear set. Watch carefully as cookies won’t brown. Remove from oven and allow to cool on the baking sheet for 10 minutes, then transfer to a wire rack to cool completely.
- Prepare Frosting: Beat softened butter on medium speed until creamy, about 1 minute. Add confectioners’ sugar, milk, vanilla extract, and peppermint extract. Beat on low speed for 30 seconds, then increase to medium-high speed and beat for 2 minutes. Adjust consistency by adding more sugar to thicken or more milk to thin. Add a pinch of salt to balance sweetness.
- Optional Tinting: If desired, add 1 drop of red or pink food coloring and beat until color is evenly distributed, adding more to deepen color.
- Frost Cookies: Using a knife or icing spatula, spread frosting on cooled cookies. Lightly sprinkle crushed candy canes on top.
- Storage: Store frosted cookies covered at room temperature for up to 1 day or refrigerate for up to 5 days. Frosting soft-sets after a few hours, developing a slightly dry top layer.
Notes
- The cornstarch and confectioners' sugar are essential for the cookie’s tender, meltaway texture.
- Chilling the dough for at least 30 minutes is mandatory to ensure proper texture and easier handling.
- Slightly flatten dough balls before baking so cookies spread evenly without becoming too thick or cakey.
- Use crushed candy canes for a festive garnish and extra peppermint flavor.
- Adjust frosting thickness by adding confectioners’ sugar or milk as needed.
- Frosted cookies can be refrigerated for up to 5 days, but bring to room temperature before serving for best texture.
Nutrition
- Serving Size: 1 cookie
- Calories: 150 kcal
- Sugar: 12 g
- Sodium: 55 mg
- Fat: 9 g
- Saturated Fat: 5 g
- Unsaturated Fat: 3 g
- Trans Fat: 0 g
- Carbohydrates: 18 g
- Fiber: 0.5 g
- Protein: 1 g
- Cholesterol: 20 mg


Leave a Reply